Monday, September 30, 2013

Going Pro and Chili Time


Why Go Pro

In the computer age it’s hard not to be a do-it-yourselfer. Want to know how to grout kitchen tile or install a hardwood floor?  Hundreds of suggestions are just a Google search or youtube video away. And if you’re one of those people who thinks a tool belt is a piece of fashion clothing, performing such specific tasks is likely to have a successful outcome.

But when it comes to designing or remodeling an entire kitchen, we believe the only way to go is pro. Bottom line (and that is a key consideration), a savvy design professional will help you make informed, cost-saving decisions, as well as addressing the pertinent function and lifestyle issues that will guarantee a happy end result. 

Remember there’s more to a kitchen than meets the eye. In addition to making a myriad of decisions about color, cabinets, countertops, backsplashes, appliances and so on, there are electrical, plumbing and lighting considerations.  There’s undoubtedly a youtube video for each of these items but trying to put that puzzle together on your own could will quickly turn your dream kitchen into a nightmare and be way more costly in the long run.

At kabi we encourage working with design professionals so you can get on with the all important business of enjoying your kitchen.


Picking A Pro

Start with who you know.  Does a friend or neighbor have a kitchen you really like or admire? Ask them for a referral.  Or take the time to go on kitchen or home tours in your area.  It’s a good way to see the work of a variety of designers and you’ll likely get some great ideas for your own project.

Many professional organizations such as the NKBA (National Kitchen & Bath Association: www.nkba.org) include online services for finding a designer in your city or town. Organizations like the AIA (American Institute of Architects:  www.aia.org) and ASID (American Society of Interior Designers:  www.asid.org) offer similar services on their websites.

Once you have a list of names visit their websites to see if their design styles mesh with yours. Narrow your list to three or four and start the contact process. Then look to our next blog entry for tips on how to prepare for your meeting with a design professional. 

Squash Lover’s Delight
In the meantime, consider making the yummy fall recipe below. It’s a perfect combo for meat eaters and veggie lovers alike.  With the abundance of squash available this time of year, the recipe uses butternut squash to add an unexpected layer of richness to an otherwise classic chili recipe.

Beef and Butternut Chili 


Ingredients                 
1 tablespoon canola oil, divided
1 1/2 pounds boneless chuck roast, trimmed and cut into 1/2-inch cubes
3/4 teaspoon salt
1 1/2 cups chopped onion
1/2 cup chopped green bell pepper
2 tablespoons tomato paste
1 tablespoon minced fresh garlic
2 teaspoons diced jalapeño pepper
2/3 cup dry red wine
1 1/2 teaspoons ground ancho chile pepper
1 teaspoon dried oregano
1/2 teaspoon ground red pepper
1/4 teaspoon ground cumin
1/4 teaspoon ground coriander
1/8 teaspoon ground cinnamon
1 (28-ounce) can whole tomatoes, undrained and chopped
1 (15-ounce) can no-salt-added kidney beans, rinsed and drained
2 cups (1/2-inch) cubed peeled butternut squash
1 cup coarsely chopped carrot
6 tablespoons (reduced-fat )sour cream
2 tablespoons fresh cilantro leaves
Preparation
1. Heat a large Dutch oven over medium-high heat. Coat pan with cooking spray. Add 1 teaspoon oil; swirl. Sprinkle beef with salt. Add beef to pan; sauté 8 minutes, turning to brown on all sides. Remove beef.
2. Add 2 teaspoons oil to pan. Add onion and bell pepper; sauté 3 minutes. Add tomato paste, garlic, and jalapeño; sauté 2 minutes, stirring constantly. Add wine; bring to a boil, scraping pan. Cook 2 minutes. Return beef to pan.
3. Stir in ancho chile pepper and the next 7 ingredients (through kidney beans), and bring to a boil. Cover, reduce heat to medium, and simmer gently for 1 hour. Add butternut squash and 1 cup carrot, and simmer for 1 hour or until beef is tender. Ladle 1 1/3 cups chili into each of 6 bowls, and top each with 1 tablespoon sour cream and 1 teaspoon cilantro

Monday, September 23, 2013

Soup's On


The autumn chill is in the air and as we say good by to the fruits and veggies we savored in summer our thoughts turn to the comfort food that accompanies colder days and nights. And for many of us those thoughts include the aroma and taste of a hearty soup.

Nothing like having a cabinet deep enough to stow your stock pots like the kabi  custom feature pictured here.
The word soup is said to derive from the bread over which gruel was poured, called a sop or sup. In fact, it's likely that people have been enjoying some version of meat cooked in heated water throughout history.  In times when food was scarce dumping various ingredients into a pot to boil was not only cheap, it was filling, and most cultures have adopted their own variations like Italian minestrone, French onion and Russian borscht.

Seems like everyone has a favorite soup recipe and here’s one we hope you’ll want to add to your cooking file.  Filled with lots of Indian spices your friends and family will warm up just smelling the aromatic curry that fills the air. Feel free to comment or leave a recipe of your own to pass along.


Curried Red Lentil Soup


1   Tbsp. vegetable oil
1   large onion, chopped
3   cloves garlic, minced
2   Tbsp. minced peeeld gingerroot
1   jalapeno pepper, seeded and minced
1½ tsp. cinammon
1    tsp. ground cumin
1½ Tbsp curry powder

2    bay leaves
 cups red lentils, rinsed and picked over
8    cups chicken broth
2    Tbsp. chopped cilantro
2    Tbsp. fresh lemon juice
2    Tbsp. mango chutney
Salt and freshly ground pepper to taste
1/3  cup nonfat yogurt

In a heavy saucepot, heat oil over medium heat. Add onions and saute until softened, 3-5 minutes. Add garlic, ginger, jalapenos, curry powder, cinammon, cumin, and bay leaves and cook, stirring, for about 5 minutes longer.

Stir in lentils and chicken stock and bring to a boil. Reduce heat to a low simmer, partially covered, for about another 45 minutes, or until the lentils are tender.

Discard bay leves. Sitr in cilantro, lemon juice and chutney. Season with salt and pepper. Ladle the soup into bowls and garnish with yogurt. Serve with Naan (an Indian bread available frozen at many grocery stores), or a favorite crusty bread, and it’s a meal.

Monday, September 16, 2013

Bakers Take Note


We’re coming on that time of year when the delicious aroma of pumpkin pies and holiday cookies start to fill your kitchen. If you’re one of those make-it-from-scratch bread and pie makers, and a new kitchen or a remodel is in your future, you might want to consider a custom baking center.
Planning a baking center
Baking centers are easily placed in an island or perimeter location. Regardless of placement you want a prep area, proximity to ovens, and lots of landing space for hot cookie sheets and cake pans. Many home bakers drop a section of their standard 36-inch counter top to between 30 and 33 inches to create a comfortable space for mixing, kneading and rolling out dough.
 Outfitting your baking center
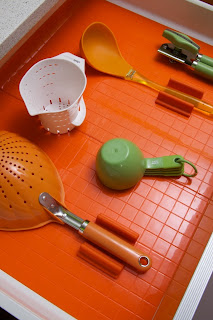
One ideal cabinet accessory is a utensil organizer to keep all of your baking tools organized and at the ready to whip up your favorite treats.
kabi's standard drawer is deep enough to accommodate many of your favorite cooking and baking utensils.
If you use a heavy stand mixer a mixer lift could prove essential, double wall ovens provide lots of baking racks, and roll out drawers for accessing baking pans and mixing bowls are really helpful.
Easy glide drawers are among the many behind-the-door kabi options.
Topping your baking center
Marble has long been the material of choice for home bakers because its smooth, cool surface is perfect for kneading dough but granite has became an accepted alternative for its cool hardness. It should be noted both these surfaces require sealing.
Engineered quartz-surfacing offers the same benefits as marble or granite, but without the maintenance requirements. Because they’re non-porous, engineered stone tops like Caesarstone, Cambria and Zodiaq also reduce your contamination risk.

Friday, September 6, 2013

How Work Triangles Work


Even if you’re an exercise fanatic, the place to be running marathons is not in your kitchen. That’s why the classic work triangle can be a key component to any well functioning kitchen layout. The goal of the work triangle is to place the three most common work sites:  the refrigerator, sink, and stove, the most efficient distance apart from each other.  When it’s time to prepare meals the distance you walk to grab veggies from the fridge to washing them in the sink to stir frying them on the stove should be several steps, not several yards. When you are done preparing a meal you shouldn’t be too exhausted to enjoy it

Proper placement is critical because if the three essential areas are too far apart you’ll be wasting steps and energy but if they are too close to each other you’ll have a cramped kitchen without any place to work.  Some basic rules of thumb for an optimal triangle are:
  • Each leg of the triangle should be between 4 and 9 feet
  • The total of all three legs should be between 12 and 26 feet
  • No obstructions (cabinets, islands, etc.) should intersect a leg of the work triangle
  • Household traffic should not flow through the work triangle 
An example of a work-triangle. Notice how the island is designed to give family and friends a place to visit without getting in the way of the cook.