Thursday, December 12, 2013

Cabinets and Canines


At kabi we take two things very seriously:  cabinets and canines. And because so many people feed their pups in our favorite room of the house we think there’s no reason why you can't have a beautiful kitchen with a dog bowl to match.  So if you’re one of those dog lovers who buy gifts for your pets consider giving your Fido or Sadie or Rex a place to chow down that’s worthy of your dog and your kitchen.
kabi owner Steve Johnson with Jack


Visit www.etsy.com to view their wide assortment of LuckyPups Personalized Bowls. Unique in style and design each bowl is permanently etched with your dog’s name in fun fonts to match your pup’s personality. An ideal blend of style and functionality the non-tip bowls come with removable rubber rings that can reduce sliding, undesirable noise, and damage to the floor. Available in eight colors:  stainless steel, metallic blue, metallic purple, metallic charcoal, metallic magenta, baby pink, baby blue, and lavender. They come in small, medium, large, and x-large for your pet’s convenience.


Personalized Bowls from LuckyPups


For those who love the bold colors of Fiestaware china there are pet bowls to match. Available in peacock, scarlet, shamrock and sunflower there’s a hue to complement every dog and every kitchen. www.fiestafactorydirect.com


Finally, on a more practical note consider making your dog a happy camper or contented traveler with a Yummy Pet Travel Dog Bowl. A 3-in-1 solution for storing, transporting, and serving pet food and water simultaneously, a spill resistant water bowl serves as the base, while the food bowl fits neatly into the water bowl for a leak-free top. A lid seals it all up tight, or becomes an extra bowl when flipped over allowing dry food, wet food, and water to be served in separate bowls.  Made by Brookstone. Available at www.amazon.com
For the traveling pooch


Monday, November 18, 2013

Gobble Gobble

Pretty much everyone loves Thanksgiving. What's not to love about friends and family coming together to give thanks for the good things in our lives and then sharing a scrumptious meal. But before the bird gets stuffed and the sweet potato pie gets baked there's the all important ritual of setting the table.  A beautiful tablescape not only sets the tone for the meal to come it tells your guests how much they mean to you. Here are four suggestions for making your holiday table a little more special and a whole lot more fun.

1.  Platter Chatter. So what if you only use it once a year, think of a turkey platter as an heirloom piece that will hold turkey memories for Thanksgivings yet to come.  If you can't find one to suit your design style consider heading for a ceramic shop where you (and the kids) can make your own. And be sure to check ebay for one-of-a-kind ideas.
Go Traditional


Do It Yourself

It doesn't have to have a turkey on it.


2.  Salt and Pepper Style.  A simple way to spice up your table.


3.  The Name Game.  Rather than everyone standing around asking, "where should I sit?" place cards make getting started so much easier.  For an extra treat tuck a lottery ticket behind each card and have your guests try their luck before dessert is served. Might end up with something extra to be grateful for!
Woodland creature make perfect place card holders. Tuck a lottery ticket behind each card to add to the holiday fun.


4.  Cranberry Crisp:  Side Dish or Dessert??  Whenever you decide to serve this tasty dish you can't go wrong. It makes a nice change from the usual jellied canned variety or a tasty alternative to apple pie. If you go with the latter, a dollop of whipped cream or vanilla ice cream is a must.


Cranberry Crisp Recipe
4 med apples (use Granny Smith for a slightly tarter crisp)
1 can whole cranberries
1 tsp cinnamon
1 cup uncooked oats
1/2 c flour
1 c brown sugar firmly packed
1/2 cup butter melted

Peel apples, slice thin and arrange in a glass baking dish.
Sprinkle with cinnamon.
Spoon cranberry sauce over apples.
Mix oats, flour, and brown sugar, add melted butter and mix until somewhat crumbly. Spread over cranberry layer.
Bake in 350 oven about 40 minutes until top is brown.
Serve at room temperature.

Happy Thanksgiving!!!!


Tuesday, October 29, 2013

Sophisticated Ghoul


Selecting black kitchen cabinets because they’d look cool with orange accents on Halloween is the wrong reason for going that design direction.  The right reason is because black cabinets are sophisticated and elegant, and make a fabulous centerpiece in a contemporary setting.  Just like a classic black cocktail dress shines with the right accessories, black cabinets are easily enhanced with a fun backsplash and they really know how to wear stainless steel accents and appliances. 
kabi's black sculpted laminate cabinets made a strong contemporary statement.
Our infinity pull helps continue the clean lines.
And if your taste leans towards the clean, sleek lines of an ebony kitchen (or an all white one) come Halloween you might prefer a more artful approach to your holiday treats. Forget those mainstream candy corn topped cupcakes and go with a tray of these Jackson Pollack Candied Apples.

Jackson Pollack Candied Apples


Ingredients
         6 Granny Smith apples
         3 ounces bittersweet chocolate, coarsely chopped
         2 1/2 ounces premium white baking chocolate (such as Baker's), coarsely chopped

Preparation
Wash and dry apples; remove stems. Insert a wooden stick into the stem end of each apple.
Place bittersweet chocolate in a glass bowl; microwave at HIGH 1 minute or until melted, stirring every 20 seconds until smooth. Working with 1 apple at a time, hold apple over bowl. Using a spoon, drizzle apple with about 2 teaspoons bittersweet chocolate. Place apple, stick side up, on a baking sheet covered with wax paper. Repeat procedure with remaining apples.
Place white chocolate in a glass bowl; microwave at HIGH 1 minute or until melted, stirring every 15 seconds until smooth. Working with 1 apple at a time, hold apple over bowl. Using a spoon, drizzle apple with about 1 1/2 teaspoons white chocolate. Place apple, stick side up, on baking sheet covered with wax paper. Repeat procedure with remaining apples. Chill apples until ready to serve.

Monday, October 14, 2013

Mid-century Modern and Grasshopper Pie


Is American Graffiti one of your favorite movies?  Do you wax nostalgic for June, Ward, Wally and the Beav?  What about Donna Reed vacuuming with her pearls on?  If you answered yes to any of those questions you likely have affection for mid-century architecture as well. 

Popular in the post World War II era mid century modern homes like ranches were inexpensive to build and served the needs of returning service men and their families well.  The split-level versions were called California ranches. To see some primes examples of that architectural period take a drive through Arapahoe Acres (wwwarapahoeacres.org) in Englewood where you’ll get to see Sears Kit homes featured in Better Homes and Gardens in the 1960s and other iconic residences. Current homeowners have made great strides to preserve the architectural integrity of a time gone by.

Classic 1952 ranch by architect Edward Hawkins in Arapahoe Acres
But even if your home’s architecture isn’t true to that era, you can still have a kitchen reminiscent of the 1950s and 60s. Start by channeling your inner June and Ward and embrace the bold colors and unique designs of a time when the American dream was just emerging.
At kabi the sky's the limit when it comes to color combinations for your MOD kitchen design.
Accessories Galore

Decorating a MOD style kitchen is almost as much fun as designing one. The retro clock and spoon stool are both available at www.modlivin.com


Grasshopper Pie

Even if your MOD kitchen is percolating on the back burner for now, you can still introduce your friends and family to a mouth watering taste of nostalgia with this delightfully, delicious green grasshopper pie. And don’t skip the food dye; half the fun is eating something green.

Grasshopper Pie Recipe

INGREDIENTS
     20   Oreo cookies (40 halves), fillings discarded, cookies crushed
5 Tbsp butter, melted
           3/4 cup hot milk
    24 large marshmallows
    1/4 cup creme de menthe liqueur
    2 tablespoons white creme de cacao
    1 cup whipping cream, whipped
    Optional A drop or two of green food dye.

METHOD

1 Preheat oven to 425°F. In a bowl, mix crushed Oreo cookie halves and butter. Pat into bottom and sides of 10-inch pie dish. Bake in oven for 5 to 10 minutes; remove from oven and cool completely. Once cooled, place in freezer to chill.

2 In saucepan, melt marshmallows in milk over medium heat. Remove from heat and cool. Add creme de menthe and creme de cacao, and mix well. Add a drop or two of green food dye if desired. Fold in whipped cream. Pour into chilled pie shell. Freeze for 3 or 4 hours.
Serve with a dollop of whipped cream.

Monday, October 7, 2013

Meeting with a Design Pro and Apple Crumble Pie


Last week we discussed the reasons why you should work with a design professional. This week we take a look at how to prepare for a meeting with a designer.

Getting Ready

  • Do Your Homework.  Arrive with a general idea of the look, flow and equipment you want. Bring a floor plan of your current kitchen, a wish list for cabinets and appliances, and any magazine photos you’ve gathered that indicate your style preferences.

  • Establish a Budget.  If you can afford pro grade appliances and high end finishes your designer needs to know that from the start so they can integrate those ideas into the design.  On the flip side, be honest about your financial constraints. Good designers will have the know-how to stretch your dollars as far as they can go.

  • Questions to Think About.  A good designer will want to know lots of things about what we call your personal kitchen style.  Questions will include: Who’s in your family?  Who uses the kitchen? What’s your cooking style?  (solo, just the two of you, lots of helpers). Do you want a computer center? Will kids do homework there?  Are there ergonomic and accessibility issues?
 
This elegant kabi kitchen was the result of homeowners knowing what they wanted and relying on professional advice to make it happen.
  • Questions to Ask.  Request photos of actual projects the designer has worked on—not brochures from manufacturers.  Ask if they have done any project similar in size and scope to yours and what it cost. You should also request information regarding payment schedules, contracts, and timelines. Ask for references and be sure to call them before you sign anything.

  • Go with Your Gut.  Of course you want to hire someone whose work you like but beyond that the ideal designer-client relationship is based on honesty, trust, communication, respect, and a sense of teamwork.  Remember whoever you chose is going to be in your home and disrupt your lives for as long as it takes to get the job done. Trusting and liking the person you hire will go along way toward making the design or remodel of your kitchen a positive experience.


Apple Crumble Pie
Part pie, part crisp and totally delicious.

1 (9 inch) pie crust, unbaked
FILLING
2 teaspoons lemon juice
1/2 cup sugar
1/2 teaspoon cinnamon
5 cups apples, cored and sliced (about 5 small, Granny Smith apples work well)
1/2 cup raisins (optional)


TOPPING
3/4 cup flour
1/2 cup sugar
1/2 teaspoon cinnamon
1/3 cup butter

DIRECTIONS
1.   Preheat oven to 425 degrees and set butter out so it will be at room temperature.
2.    Line 9" pie pan with unbaked crust.
3.    Core and slice apples.
4.    Sprinkle the apples with the lemon juice.
5.    Mix in the sugar & cinnamon.
6.    Fill pie shell with apple mixture.
7.    In a small bowl, mix the topping's flour, sugar and cinnamon.
8.    Rub the topping ingredients and butter together with your fingers until the mixture is crumbly.
9.    Sprinkle topping over pie.
10.   Bake 10 minutes at 425 degrees then reduce oven temperature to 350 degrees and bake until crumb topping is browned and apples are soft, approximately 50 minutes.  Serve with vanilla ice cream of desired.


Monday, September 30, 2013

Going Pro and Chili Time


Why Go Pro

In the computer age it’s hard not to be a do-it-yourselfer. Want to know how to grout kitchen tile or install a hardwood floor?  Hundreds of suggestions are just a Google search or youtube video away. And if you’re one of those people who thinks a tool belt is a piece of fashion clothing, performing such specific tasks is likely to have a successful outcome.

But when it comes to designing or remodeling an entire kitchen, we believe the only way to go is pro. Bottom line (and that is a key consideration), a savvy design professional will help you make informed, cost-saving decisions, as well as addressing the pertinent function and lifestyle issues that will guarantee a happy end result. 

Remember there’s more to a kitchen than meets the eye. In addition to making a myriad of decisions about color, cabinets, countertops, backsplashes, appliances and so on, there are electrical, plumbing and lighting considerations.  There’s undoubtedly a youtube video for each of these items but trying to put that puzzle together on your own could will quickly turn your dream kitchen into a nightmare and be way more costly in the long run.

At kabi we encourage working with design professionals so you can get on with the all important business of enjoying your kitchen.


Picking A Pro

Start with who you know.  Does a friend or neighbor have a kitchen you really like or admire? Ask them for a referral.  Or take the time to go on kitchen or home tours in your area.  It’s a good way to see the work of a variety of designers and you’ll likely get some great ideas for your own project.

Many professional organizations such as the NKBA (National Kitchen & Bath Association: www.nkba.org) include online services for finding a designer in your city or town. Organizations like the AIA (American Institute of Architects:  www.aia.org) and ASID (American Society of Interior Designers:  www.asid.org) offer similar services on their websites.

Once you have a list of names visit their websites to see if their design styles mesh with yours. Narrow your list to three or four and start the contact process. Then look to our next blog entry for tips on how to prepare for your meeting with a design professional. 

Squash Lover’s Delight
In the meantime, consider making the yummy fall recipe below. It’s a perfect combo for meat eaters and veggie lovers alike.  With the abundance of squash available this time of year, the recipe uses butternut squash to add an unexpected layer of richness to an otherwise classic chili recipe.

Beef and Butternut Chili 


Ingredients                 
1 tablespoon canola oil, divided
1 1/2 pounds boneless chuck roast, trimmed and cut into 1/2-inch cubes
3/4 teaspoon salt
1 1/2 cups chopped onion
1/2 cup chopped green bell pepper
2 tablespoons tomato paste
1 tablespoon minced fresh garlic
2 teaspoons diced jalapeño pepper
2/3 cup dry red wine
1 1/2 teaspoons ground ancho chile pepper
1 teaspoon dried oregano
1/2 teaspoon ground red pepper
1/4 teaspoon ground cumin
1/4 teaspoon ground coriander
1/8 teaspoon ground cinnamon
1 (28-ounce) can whole tomatoes, undrained and chopped
1 (15-ounce) can no-salt-added kidney beans, rinsed and drained
2 cups (1/2-inch) cubed peeled butternut squash
1 cup coarsely chopped carrot
6 tablespoons (reduced-fat )sour cream
2 tablespoons fresh cilantro leaves
Preparation
1. Heat a large Dutch oven over medium-high heat. Coat pan with cooking spray. Add 1 teaspoon oil; swirl. Sprinkle beef with salt. Add beef to pan; sauté 8 minutes, turning to brown on all sides. Remove beef.
2. Add 2 teaspoons oil to pan. Add onion and bell pepper; sauté 3 minutes. Add tomato paste, garlic, and jalapeño; sauté 2 minutes, stirring constantly. Add wine; bring to a boil, scraping pan. Cook 2 minutes. Return beef to pan.
3. Stir in ancho chile pepper and the next 7 ingredients (through kidney beans), and bring to a boil. Cover, reduce heat to medium, and simmer gently for 1 hour. Add butternut squash and 1 cup carrot, and simmer for 1 hour or until beef is tender. Ladle 1 1/3 cups chili into each of 6 bowls, and top each with 1 tablespoon sour cream and 1 teaspoon cilantro

Monday, September 23, 2013

Soup's On


The autumn chill is in the air and as we say good by to the fruits and veggies we savored in summer our thoughts turn to the comfort food that accompanies colder days and nights. And for many of us those thoughts include the aroma and taste of a hearty soup.

Nothing like having a cabinet deep enough to stow your stock pots like the kabi  custom feature pictured here.
The word soup is said to derive from the bread over which gruel was poured, called a sop or sup. In fact, it's likely that people have been enjoying some version of meat cooked in heated water throughout history.  In times when food was scarce dumping various ingredients into a pot to boil was not only cheap, it was filling, and most cultures have adopted their own variations like Italian minestrone, French onion and Russian borscht.

Seems like everyone has a favorite soup recipe and here’s one we hope you’ll want to add to your cooking file.  Filled with lots of Indian spices your friends and family will warm up just smelling the aromatic curry that fills the air. Feel free to comment or leave a recipe of your own to pass along.


Curried Red Lentil Soup


1   Tbsp. vegetable oil
1   large onion, chopped
3   cloves garlic, minced
2   Tbsp. minced peeeld gingerroot
1   jalapeno pepper, seeded and minced
1½ tsp. cinammon
1    tsp. ground cumin
1½ Tbsp curry powder

2    bay leaves
 cups red lentils, rinsed and picked over
8    cups chicken broth
2    Tbsp. chopped cilantro
2    Tbsp. fresh lemon juice
2    Tbsp. mango chutney
Salt and freshly ground pepper to taste
1/3  cup nonfat yogurt

In a heavy saucepot, heat oil over medium heat. Add onions and saute until softened, 3-5 minutes. Add garlic, ginger, jalapenos, curry powder, cinammon, cumin, and bay leaves and cook, stirring, for about 5 minutes longer.

Stir in lentils and chicken stock and bring to a boil. Reduce heat to a low simmer, partially covered, for about another 45 minutes, or until the lentils are tender.

Discard bay leves. Sitr in cilantro, lemon juice and chutney. Season with salt and pepper. Ladle the soup into bowls and garnish with yogurt. Serve with Naan (an Indian bread available frozen at many grocery stores), or a favorite crusty bread, and it’s a meal.

Monday, September 16, 2013

Bakers Take Note


We’re coming on that time of year when the delicious aroma of pumpkin pies and holiday cookies start to fill your kitchen. If you’re one of those make-it-from-scratch bread and pie makers, and a new kitchen or a remodel is in your future, you might want to consider a custom baking center.
Planning a baking center
Baking centers are easily placed in an island or perimeter location. Regardless of placement you want a prep area, proximity to ovens, and lots of landing space for hot cookie sheets and cake pans. Many home bakers drop a section of their standard 36-inch counter top to between 30 and 33 inches to create a comfortable space for mixing, kneading and rolling out dough.
 Outfitting your baking center
One ideal cabinet accessory is a utensil organizer to keep all of your baking tools organized and at the ready to whip up your favorite treats.
kabi's standard drawer is deep enough to accommodate many of your favorite cooking and baking utensils.
If you use a heavy stand mixer a mixer lift could prove essential, double wall ovens provide lots of baking racks, and roll out drawers for accessing baking pans and mixing bowls are really helpful.
Easy glide drawers are among the many behind-the-door kabi options.
Topping your baking center
Marble has long been the material of choice for home bakers because its smooth, cool surface is perfect for kneading dough but granite has became an accepted alternative for its cool hardness. It should be noted both these surfaces require sealing.
Engineered quartz-surfacing offers the same benefits as marble or granite, but without the maintenance requirements. Because they’re non-porous, engineered stone tops like Caesarstone, Cambria and Zodiaq also reduce your contamination risk.

Friday, September 6, 2013

How Work Triangles Work


Even if you’re an exercise fanatic, the place to be running marathons is not in your kitchen. That’s why the classic work triangle can be a key component to any well functioning kitchen layout. The goal of the work triangle is to place the three most common work sites:  the refrigerator, sink, and stove, the most efficient distance apart from each other.  When it’s time to prepare meals the distance you walk to grab veggies from the fridge to washing them in the sink to stir frying them on the stove should be several steps, not several yards. When you are done preparing a meal you shouldn’t be too exhausted to enjoy it

Proper placement is critical because if the three essential areas are too far apart you’ll be wasting steps and energy but if they are too close to each other you’ll have a cramped kitchen without any place to work.  Some basic rules of thumb for an optimal triangle are:
  • Each leg of the triangle should be between 4 and 9 feet
  • The total of all three legs should be between 12 and 26 feet
  • No obstructions (cabinets, islands, etc.) should intersect a leg of the work triangle
  • Household traffic should not flow through the work triangle 
An example of a work-triangle. Notice how the island is designed to give family and friends a place to visit without getting in the way of the cook.

Friday, August 30, 2013

Personalizing Your Kitchen


A friend of mine has this beautiful gray wool Italian coat. It’s soft and classic in every way, and like my friend, the coat is not without its surprises. One evening she stopped by and tossed the coat on the nearest chair. It fell open to reveal an unexpected paisley lining in the most luscious shade of violet.  When she saw the look of surprise and delight on my face she said, “I know hardly anyone ever gets to see it but that lining reflects my personality and I know it’s there.  I think of it as a special treat just for me.”

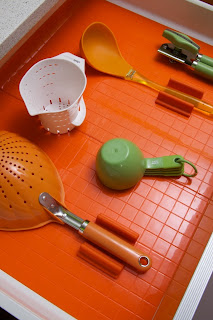
It’s those little unexpected things that make ordinary everyday moments more enjoyable so why not include something like that in other places in your life, like your kitchen.  Picking a wonderful color or pattern for the outside of your cabinets is one way to express yourself, but lining the interior in a warm pumkin orange, bright sky blue, sunny yellow, soft gray, or bold shade of lime provides another layer to your kitchen that few people will see, but you will always know is there. Of course, if you go with glass front doors, some of that color will shine through for all to enjoy.

At kabi we think those colorful cabinet interiors are another way of customizing your kitchen and getting the look that matches your home and your personality. 
 Mod style kabi cabinet with one of our many interior finishes.